3 rules that always apply in regard to unit-test:
1. Do NOT unit-test your infrastructure
2. Test should be automated without user intervention
3. Design is easy to test, by human eyes. Not by machines.
Let’s now see how our UI fits into this equation. Firstly, user interface involves a lot of infrastructure. To name a few: Http layers, GDI, session management, control callback, and all kind of web security manners. These things are not within our comfort zone and should not be coupled with our unit-test.
Secondly, there is virtually no way to navigate UI without having your hands on mouse and keyboard. Remember, the first word in UI is “User”.
And last, UI is all about design. The UI elements themselves have little meaning to machines, but it means everything on human perception. You might not even notice few slight changes on UI design, but it’s more than likely to break all automated UI test scripts.
Try unit testing your UI, and you’ll quickly break all those 3 rules. User interface code has seemed to repel all but the most serious attempts at test automation. Therefore, automated testing against UI code was just flat out deemed too much work for the gain.
The equation has changed over the last several years with the emergence of MVC architecture. MVC is UI pattern that improves UI testability. UI is an ugly untestable part of the application, and using MVC, we want to isolate the ugliness in one place (the View), and put the logic in a place that’s easier to test (the Controller). We will slice the View as thin as possible. Put as little code as possible in the View. Remember, any code in a View is almost automatically harder to test than it would be in a Controller.
Castle Monorail is one of the first MVC alternatives to ASP.Net web-form. It’s based on Ruby on Rails, and brings 2 most important features to Asp.Net: simplicity and separation of concerns. To demonstrate how it can improve web development, I will show an overly simplistic demo application using untestable ASP.Net web form, and demonstrate how easy it is to switch to Monorail counterpart, and make it a fully testable web application.
The application is “The Pester”. It allows users (employees) to login into the system, so their boss can assign them with tasks and keep bugging them for the rest of the day. Hence the application name.
First screen is a pretty basic login screen.


It asks for username and password, authenticate to SecurityService. If fails, display a message the the user. And if authentication passes, it will redirect to “View Task Summary” screen. It’s not that complex of a requirement really. The code behind of the webform:
|
public partial class login : System.Web.UI.Page
{
protected void Page_Load(object sender, EventArgs e)
{
this.lbLoginFailure.Visible = false;
}
protected void btLogin_Click(object sender, EventArgs e)
{
SecurityService securityService = new SecurityService();
bool isSuccess = securityService.AuthenticateLogin(
this.txUsername.Text, this.txPassword.Text);
if(!isSuccess)
this.lbLoginFailure.Visible = true;
else
Response.Redirect(“viewTask.aspx”);
}
}
|
That’s pretty self-explanatory. And now the “View Task Summary” screen looks like the following:

It starts with a very friendly welcoming message, which is followed by a list of all the tasks for current user fetched from the database. The aspx code:
|
<%@ Page Language=”C#” AutoEventWireup=”true”
CodeBehind=”taskSummary.aspx.cs”
Inherits=”SheepTask.WebForm.viewTask” %>
<html xmlns=”http://www.w3.org/1999/xhtml” >
<head runat=”server”>
<link rel=”stylesheet” href=”css/default.css”
type=”text/css” />
<title>Tasks From Pester</title>
</head>
<body>
<form id=”form1″ runat=”server”>
<h1>Now Get Back to Work!</h1>
<asp:DataGrid id=”dgTasks”
HeaderStyle-CssClass=”gridHeader” CssClass=”grid”
runat=”server” AutoGenerateColumns=”False”>
<Columns>
<asp:BoundColumn ItemStyle-Width=”100″
DataField=”SlaDate” HeaderText=”SLA”
DataFormatString=”{0:dd/MM/yyyy}” />
<asp:BoundColumn ItemStyle-Width=”120″
DataField=”AssignerName” HeaderText=”Assigner” />
<asp:HyperLinkColumn ItemStyleWidth=”500″
DataNavigateUrlField=”TaskID”
DataNavigateUrlFormatString=
“taskDetail.aspx?taskId={0}”
DataTextField=”Title” HeaderText=”Task”/>
</Columns>
</asp:DataGrid>
</form>
</body>
</html>
|
And the code behind of the webform:
|
public partial class viewTask : System.Web.UI.Page
{
protected void Page_Load(object sender, EventArgs e)
{
string username = (string)Session[“username”];
TaskRepository taskRepository = new TaskRepository();
IList<Task> tasks =
taskRepository.GetAllTasks(username);
this.dgTasks.DataSource = tasks;
this.dgTasks.DataBind();
}
}
|
That code really isn’t that complex, but let’s think about how we could automate a test for this requirement to run within our regression test suite. That little bitty coupling with web control and coupling to HttpResponse that results is a serious pain to deal with in an automated test. Furthermore, the dependency with SecurityService and TaskRepository makes it impossible to be unit-tested in isolation to backing LDAP and database. But I think the worst part is that to test this logic you have to fire up the browser, navigate through login page, then trigger the btnLogin Click event. That’s a lot of work just to get to the point at which you are exercising the code you care about.
Now, let’s rewrite these screens with Monorail. The structure of our Monorail project looks like the following.
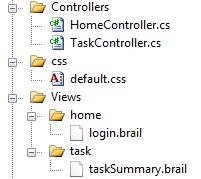
Other than default configuration to activate Monorail in Web.config, we won’t need any more configuration to get this working. This simplicity is one of the main strengths of Monorail that is well borrowed from Rail’s concept of “Convention over Configuration”. In our structure, we have 2 views split across 2 folders: home and task. By convention, the controllers will need to be defined with name HomeController and TaskController, each of which will have a method with a name corresponding to the filename of its respective view template: Login and TaskSummary. Each of the views looks like the following.
|
<html>
<head>
<link rel=”stylesheet” href=”/css/default.css”
type=”text/css” />
<title>Pester Login</title>
</head>
<body>
<form>
<% if isLoginFailed: %>
<div class=”error”>Failed to match username and password</div>
<% end %>
Username: <input name=”username” type=”text” /> <br />
Password: <input name=”password” type=”password” /> <br />
<input id=”login” value=”Login” type=”submit” />
</form>
</body>
</html>
|
|
<html>
<head>
<link rel=”stylesheet” href=”/css/default.css”
type=”text/css” />
<title>Pester Login</title>
</head>
<body>
<h1>Now Get Back to Work!</h1>
<table class=”grid”>
<tr class=”gridHeader”>
<td width=”100″>SLA</td>
<td width=”120″>Assigner</td>
<td width=”500″>Task</td>
</tr>
<% for task in taskList: %>
<tr>
<td>${task.SlaDate.ToString(“dd/MM/yyyy”)}</td>
<td>${task.AssignerName}</td>
<td>
<a href=”taskDetail.aspx?taskId=${task.TaskId}”>
${task.Title}
</a>
</td>
</tr>
<% end %>
</table>
</body>
</html>
|
Now let’s implement the controller for our first page: login. First, to allow the code to be tested without concrete implementation of LDAP SecurityService, we refactor the SecurityService to extract an interface. The following is the code for HomeController.
|
public class HomeController: SmartDispatcherController
{
private ISecurityService securityService;
public HomeController(ISecurityService securityService)
{
this.securityService = securityService;
}
public void Login()
{
PropertyBag[“isLoginFailed”] = false;
}
public void Login(string username, string password)
{
if (securityService.AuthenticateLogin
(username, password))
{
Session[“username”] = username;
Response.Redirect(“task”, “taskSummary”);
}
else
PropertyBag[“isLoginFailed”] = true;
}
}
|
Notice the ISecurityService. We no longer tie the UI with concrete implementation of SecurityService. This will allow good isolation for our unit-test later on. I also use SmartDispatcherController that gives us a slick feature for automatic data-binding. It automatically transform query string and POST values into method’s parameters with corresponding names. We have therefore 2 overload of Login method: a parameter-less method for initial visit to the login screen, and another method that takes username and password to handle user’s POST login request. The form information will automatically gets passed to both parameters. SecurityService is injected through constructor.
Our second controller follows. There’s nothing special compared to the first controller.
|
public class TaskController: SmartDispatcherController
{
private ITaskRepository taskRepository;
public TaskController(ITaskRepository taskRepository)
{
this.taskRepository = taskRepository;
}
public void TaskSummary()
{
string username = (string)Session[“username”];
PropertyBag[“taskList”] =
taskRepository.GetAllTasks(username);
}
}
|
How is this model better? Since I’ve been claiming that this style of structuring the user interface improves the testability of our web, let’s take a look at how we can write our unit-test for login. Astute readers will now note that I should be writting the unit-test code before started the controller code. But it’s a bit hard to explain things in that order.
|
[TestFixture]
public class HomeControllerTest : BaseControllerTest
{
private MockRepository mockery;
private ISecurityService service;
private HomeController controller;
[SetUp]
public void BeforeTest()
{
mockery = new MockRepository();
service = mockery.CreateMock<ISecurityService>();
controller = new HomeController(service);
PrepareController(controller);
}
[Test]
public void ShouldAlertUserForInvalidLogin()
{
using (this.mockery.Record())
{
Expect.Call(
service.AuthenticateLogin(“myUser”, “myPassword”))
.Return(false);
}
using (mockery.Playback())
controller.Login(“myUser”, “myPassword”);
Assert.AreEqual(true,
controller.PropertyBag[“isLoginFailed”]);
}
[Test]
public void SuccessfulLoginShouldRedirectToTaskSummary()
{
using (mockery.Record())
{
Expect.Call(
service.AuthenticateLogin(“myUser”, “myPassword”))
.Return(true);
}
using (mockery.Playback())
this.controller.Login(“myUser”, “myPassword”);
Assert.AreEqual(“/task/taskSummary.rails”,
Response.RedirectedTo);
}
}
|
Now you notice that since we have extracted out the interface for SecurityService, we can use Rhino-Mock to mock out the SecurityService implementation from the controller. I use BaseControllerTest from Monorail test-helper to intercept Response and Request object in order to evaluate URL redirection (to /task/taskSummary.rails) without tying the test to web infrastructure. PrepareController is one of the method comes from the BaseControllerTest that does the mock-out for us.
TaskController can be as easily unit tested in similar fashion.
|
[TestFixture]
public class TaskControllerTest: BaseControllerTest
{
[Test]
public void ShouldDisplayUsersTaskSummary()
{
MockRepository mockery = new MockRepository();
ITaskRepository taskRepository =
mockery.CreateMock<ITaskRepository>();
TaskController controller = new
TaskController(taskRepository);
PrepareController(controller);
Context.Session[“username”] = “myUser”;
List<Task> taskList = new List<Task>();
using(mockery.Record())
{
Expect.Call(taskRepository.GetAllTasks(“myUser”))
.Return(taskList);
}
controller.PropertyBag[“tasks”] = taskList;
}
}
|
That wasn’t bad, now was it? But hang on, you ask. Where is the actual logic for the login and fetching the task? For right now, I’m just worried about wiring the screen itself. Yes, this unit-test covers very little ground, but we have created some level of trust that this particularl linkage in the code does work. I can now turn my back on the UI and test the actual SecurityService and TaskRepository.
One last thing missing from this article. We unwired our controller from concrete implementation of SecurityService and TaskRepository for the sake of unit-test. So now we need to inject the dependency through the constructor of the controller. Fortunately, this can be easily solved by integrating Monorail with Castle Windsor. We need to register both controllers and backing servicees to the Windsor container.
|
windsor.AddFacility(“rails”, new RailsFacility());
windsor.AddComponent<HomeController>();
windsor.AddComponent<TaskController>();
windsor.AddComponent<ISecurityService, SecurityService>();
windsor.AddComponent<ITaskRepository, TaskRepository>();
|
The first line is to register the facility to allow Monorail to resolve its controllers from Windsor container. The rest are to register each of the controllers and services. It uses auto-wiring to automatically introspect all necessary services to instantiate a controller. Now everytime Monorail instantiate the controller, we will get all necessary logic in place. The resulted application is pretty much the same as the original webform application. But with improved separation of concern under the hood.
An incisive reader will note that we didn’t write any unit tests for the View. The philosophy in general is to make the hard to test view code so simple as to be reliably verified by inspection alone. I.e., you should make the View code so simple that it’s almost impossible to screw up.


